Strongsville Plumbing innovations are transforming the way homes function. From eco-friendly fixtures to smart home systems, these advances are helping homeowners live more comfortable and sustainable lives.
For example, leak detection technology identifies the source of a leak, saving time and money. Corrosion-resistant pipes also reduce the need for costly repairs. Hydro jetting prevents drain blockages by blitzing them with high-pressure water.

Pipe Inspection Cameras
A pipe inspection camera is a modern plumbing tool that allows plumbers to see the condition of pipes inside and out. It consists of a waterproof camera attached to a long cable that can be inserted into the pipes for inspection. The camera is connected to a monitor that shows the live footage. The monitor helps the plumber identify any problems with the plumbing system and then plan the best way to address them.
The most common use of a pipe inspection camera is to find the location of a leak. Older plumbing methods often involve guessing where the problem might be, but this new tool makes it much easier for plumbers to pinpoint the source of the leak. This can save a lot of time and money for customers.
Plumbing cameras can also be used to examine other aspects of the plumbing system. They can help find obstructions that may be blocking a pipe or drain and can also reveal damage that could cause future problems. For example, a plumbing camera can help identify tree roots that are growing into sewer lines and causing damage. The plumber can then take steps to remove the root and prevent future problems from occurring.
Other types of plumbing problems that can be identified with a camera include issues caused by animal intrusions. For instance, snakes and rats can enter the plumbing system through an access point on the outside and cause damage or blockages. A video camera inspection can identify the animal and the entry point so that the plumber can seal off the opening to keep animals out of the pipes.
A pipe camera is a very useful tool for plumbing and other professionals who work with underground infrastructure, including sewer systems, water mains, stormwater pipes, drains, ducts, and other hard-to-reach areas. It can also be used by home inspectors and real estate agents to evaluate the plumbing of a property before buying it. The camera can help spot potential problems that could be costly to fix later on. It can also verify that a repair has been made correctly so that the problem does not return.
Leak Detection
From the bustling neighborhoods to the serene neighborhoods of another, homeowners across the state face a common challenge: plumbing leaks. These hidden problems aren’t always easy to spot, but when left untreated they can cause extensive damage and lead to higher water bills. Fortunately, modern technologies help make it easier for plumbers to find and repair these issues early on.
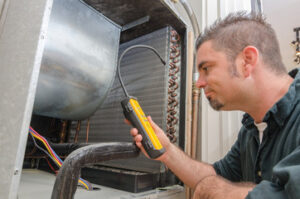
One of the most effective ways to detect a leak is with modern electronic devices like acoustic leak detection. These digital devices amplify the noise created by escaping water to pinpoint its location in your home. They’re also able to filter out other sounds that may interfere, such as pedestrian footsteps, passing vehicles, and people talking.
Another way to identify leaks is by using a thermal imaging camera. Unlike standard cameras, these thermal imaging cameras are strong enough to see through walls and other materials. They’re able to highlight dark spots where water is pooling, allowing plumbers to focus their efforts on those areas.
For more complex leaks, it’s necessary to trace your piping systems to find the exact segments that are affected. Thankfully, plumbers can use a variety of high-tech tricks to recreate these hidden pipe maps without destroying your property. Electromagnetic tracking uses sensor wands to detect electromagnetic signals sent through your piping system, while acoustic pipe tracing tracks inaudible acoustic signals. Additionally, plumbers can use video pipe inspection systems to virtually map out your piping networks down to the smallest hairline crack.
Leaks can be hard to spot, especially when they’re located under concrete or underground. Fortunately, many cutting-edge techniques can detect them and prevent costly repairs. For example, infrared thermography can see the warmer temperature of leaking water, which makes it stand out against the colder background of surrounding pipes. This non-invasive technology can be used in a variety of environments and weather conditions.
Detecting plumbing leaks is essential for preventing costly damage and maintaining the integrity of your piping systems. If you notice any signs of a leak, such as puddles or damp walls, contact your local plumber right away. With the right equipment and expertise, they can resolve any problem as quickly and efficiently as possible, minimizing potential damage and saving you money in the long run.
Trenchless Repair
Sewer and water lines are subject to a wide range of problems including cracking, leaking, or bursts. These pipes are buried underground and must endure harsh environmental conditions. If a pipe is damaged it can cause extensive damage to your property, including expensive repairs or replacement costs. Fortunately, innovative techniques such as trenchless repair can help you fix these issues without the need for expensive excavation or disruption to your home or business.
Using these methods, plumbers access sewer and water lines through existing plumbing cleanouts or small access points such as the toilet drain, a rooftop vent stack, or an exterior cleanout. Then they use a small camera to inspect the interior of your pipes and locate any areas that may need repair or replacement. With the help of this information, a professional can recommend the right solution for your pipe problem.
Trenchless sewer repair is a cost-effective and minimally invasive option for repairing and replacing broken or damaged sewer lines. It eliminates the need for digging large trenches through your property, which can damage your landscaping and ruin your yard or sidewalk. Instead, the plumbers can tap into your existing sewer line at a single point on your property and restore the line from inside.
A clogged or slow-draining sewer system is not only inconvenient, but it can also herald more serious issues such as structural failure or a collapsed line. In addition to causing severe plumbing problems, such as sewage backups, a collapsed sewer line can lead to environmental concerns including soil erosion and contamination of surrounding surfaces.
One of the most common ways that plumbing professionals can repair your sewer line is through a process called pipelining. This involves saturating a flexible liner with resin, which is then fed through the existing damaged pipe and inflated. As it expands, the liner fills in any cracks or holes that may have caused a sewer line leak.
The liners used in trenchless sewer repair, also known as cured-in-place pipe (CIPP), are designed to last decades. As a result, this is one of the most cost-effective solutions for repairing and restoring your damaged sewer or water pipes.
Artificial Intelligence
While a lot of people imagine plumbing as a trade that requires wrenches and pipes, modern technology is rapidly advancing the industry. This isn’t to say that plumbers are going to be replaced by robots—but rather that the trade will benefit from advanced tools that can identify plumbing issues before they become major problems, making them more cost-effective and timely.
One of the most important developments in the plumbing sector is artificial intelligence (AI). Specifically, intelligent systems can analyze data from sensors and other sources to identify potential problems. This is particularly useful when it comes to sewer management, as it can detect leaks and blockages in real-time and prevent environmental contamination.
In addition, smart plumbing can also improve energy efficiency in homes and businesses. By detecting occupancy patterns and adapting water temperature, these systems can significantly reduce energy consumption and costs while aligning with sustainability goals. Finally, smart plumbing can enable remote diagnostics by analyzing data from connected devices like cameras and flow meters to identify underlying problems.
This is a great way to minimize the number of emergency calls and help keep customers happy by minimizing disruptions. Additionally, it allows plumbers to focus on the most important repairs and minimize waste.
One example of an AI-powered tool is a drain inspection camera, which can quickly scan for clogs and identify the cause. The system can then display the results on a smartphone or tablet so that the plumber can see exactly what’s happening and make quick fixes.
Another example of an AI-powered plumbing tool is a predictive maintenance system that can predict when equipment will fail before it does so. This can be a significant advantage for building owners because it will allow them to save money by replacing worn components before they break down.
Overall, the future of plumbing is all about innovation and sustainability. This includes incorporating energy-efficient fixtures and appliances, reducing waste, and integrating smart technologies into the home to optimize convenience and safety. It’s a future that’s driven by AI and a desire to craft a world where water is conserved and the plumbing profession reaches new heights of excellence.